Saturday, December 28, 2013

Clean and Simple 273


This is a really fun and easy card.  I've had these embellies for a while, thinking they were the same color!  Then I put them on the gray and saw the error of my ways.  You wouldn't believe me (well, you might) but the top and bottom ones are the same, a gray and white.  The middle one has a light brown tone.  The lighting makes them look really funky.

I quit buying embellishment before the washi tape craze came.  Because of my commitment not to buy anything that is disposable (like ribbon, embellishments, stickers) until my stash was greatly decreased.  There has been a huge dent placed with over 100 cards made, but I still have too much.  With that being said, I refused to buy washi tape.  And this card example from Clean and Simple 273 has some on it.  I may not have the tape, but I do have some stamps that look like washi tape (funny how that worked out).  At the time, I didn't have any grey ink.  I do like my cards to be monochromatic as much as possible.  I inked up my stamp in black and used the second generation image. 

The inside is the same grey cs with another washi stamp using the second generation.  The sentiment stamp is from The Stamps of Life, not sure which set but I do know I had to cut the stamp so I could place the words side by side.

Thanks for stopping by!  Traci

Friday, December 27, 2013

Life So Sweet and MFT Card Sketch #152


My Favorite Things is actually a place where I get some of my favorite things.  Love their products and love their sketch ideas.  This is Card Sketch #152.   The stamp I used is from MFT DC Vertical Stamp set, the that great Monarch Border is one of MFT Die-namics.  I love their Dies!

I started with white cardstock base (5.5x4.25), layered pink vellum

Big Hugs


How do you like my new blog look?  I am still so new to this, always tweaking, changing, trying to improve.  Any comments or advice is appreciated.  Just be gentle...


I finally got a chance to make a card this week.  I fell in love with the color choices from Colour Me...!    This challenge is designed for us color lovers.  New challenges every week.  These colors tend to be used for Christmas cards, but I am so over making Christmas cards.  I am wanting/needing to make general sentiment cards.  Luckily, in my stash I have all the colors that are in the challenge.  Yea me!  These colors are so rich, I love them!  Their launch is next week.  Looks like I got a head start!

PPA185I chose to use the sketch from Pals Paper Arts 185.  The design team make such lovely samples.  You know, I've been doing some new things (they are new to me).  I get so many wonderful ideas from so many great blogs.  One great idea was to take this tag die (from My Favorite Things) which measures 4" tall.  I ran it thru my Big Shot.  Then I took the cut tag and laid the die on top of it again 1.5" from one end, and ran it through my Big Shot again.  That shortened the tag to the right size for this card.  I stamped the sentiment in black in and those cute flowers are from a punch I've had for a good 10 years.  I love daisies, my favorite flower.  Of course, the gold was run through a Cuttlebug embossing folder (swirls).  As for depleting my stash, all of the papers used where scraps that I was able to use up completely, not only for the outside of the card, but also the inside.

Thank you for stopping by!  Traci

Sunday, December 22, 2013

Froggy Hi for OWH 204


Ok, I admit it, this is so CUTE!!  I wish I could say it was easy to put together.  Well, the sketch was the easiest part.  I love it when Operation Write Home puts all the dimensions on their sketches.  That is one thing that I don't have to think about.  Thanks guys!
204
Last week was my first week and I made some major no-no's in my book and the card still turned out fabulous.  I certainly got lucky.  This week, I wanted to get everything together before I started cutting.  I first chose the patterned paper.  I really like that plaid because it has....GREEN!!  Then I chose the base card color, which is a dark green.  On the front I wanted to make sure everything matched in the same color scheme.  I like this yellow and the tan, which were both in my scrap stash.  On to the embellishments.  The diagram has a circle on the top left and this message bubble kinda fell out of the embellishment bag.  Kismet!  It was meant to be.  The embellishments on the bottom is a border die that I received several years ago in a online scrapbook kit.  I thought it coordinated nicely.  And from my plethora of fibers of so many colors. I chose to combine two colors and wrapped them around twice.

I had all of this put on and  my lovely daughter walked in and said "It looks like it needs a frog".  Kismet again!  I happen to have a frog stamp set from Stamps of Life froggy2love.  I will say this, I don't own any Copic.  In fact, I don't own any markers.  I tried stamping it with the color fill and used my colored pencils (Prismacolor) but not the right shade.  Because this set also has a solid frog, I stamped it in Momento Bamboo Leaves.  It needed a boost, so I stamped the lines with Stampin' Up Chocolate Chip.  The letters are alpha stickers.  I'm contemplating on whether in throwing out all of my alpha stickers.  I have so much! I probably won't use them very much.  That is one sure way of depleting my stash-in the trash!


I thought I was done, but it needed a little something.  I mean a 'little' something.  I looked at that set really close (I did have my glasses on) and saw this stinking cute bug.  How perfect is that?  Kismet times 3. 

The inside is simple, and echoes from the front.  The yellow square has Ribbit stamped in Chocolate Chip ink with the bug.  This stamp set also has other frog related sentiments "Hoppy Birthday" and 'don't croak', which I'm not sure I will ever use.  I might just cut off the 'don't'.  There is also a teeny tiny frog to color in, a solid lily pad and a waterlily to color.


Thanks for stopping by!  Have a Blessed Week!

Traci

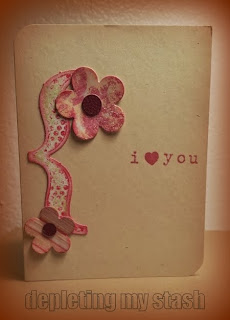
I Heart You

I normally don't make two cards of the same things.  Once in while, it just makes sense.  I am making these for Operation Write Home.  They can be used any time for anyone they love.  First I made the white CS.  The embellishments are from My Minds Eye (the bracket) and I used my Posies Die from My Favorite Things for the flowers which were cut from My Minds Eye glitter paper.  My daughter likes the kraft colored card better.  I only rounded two opposite corners.


I inked the edges of all embellishments with Momento Rhubarb Stalk.  I curled up the edges a bit. The sentiment was in the same ink as well.  Let me mention a word or two about the sentiment.  Like I've said before, I've been stamping for 20 years.  I had these alphabet stamps for a while.  I remember that I had to mount them myself and apply the stickers.  I haven't used them in years.  They were stored in a sandwich bag.  Some of the rubber had some off the wood which gave me the grand idea to take off them off.  And I tossed the wood.  And I have no regrets!  I put them sticky side down in a box of cling stamps that I won from Stampin Up.  I had to do some trimming on the letters to get them to line up.  I love the heart that came with the alphabet.  There's a star and a square and numbers!    I hope to be using them more now that I can put them on my stamp block and stamp the word at the same time.

The elegant sketch is from CAS(e) this Sketch 51.  I am also entering this into Muse Challenge 48.  .  I am using the die cut flowers as my inspiration.  This is my first time participating in their challenge.  I like the fact that you need to leave comments on three other entries and them vote for your favorite. 

Thank you so much for stopping by!

Traci

Tuesday Morning Sketches 229 & JUGS 220


I had to go back to work.  Vacation was over.  It was a wonderful 12 days off.  I got to do whatever I wanted.  It was another staycation, which I am really learning to appreciate.  There were so many things to get done that is difficult to do while I work.  Like go to the dentist (which ended up being a huge fiasco and I have to go back in two weeks-yuck!) and find a new apartment.  I was able to find one about 5 miles away that fits my needs better.  I went to several movies with my daughter and some friends, eat out and shop and of course, STAMP!  But now that I am back to working, I am not finding the time in the evening to make anything.  So, I committed this weekend to do what I want (again).  This is so easy for me because I am single, my youngest is 18 and has her own life.  Ok, enough about me.


Tuesday Morning Sketches 229 has a wonderful sketch to play with.  I used the colors that I had on my table from the other cards I created.  I did pull some dark brown that I needed so I could participate in Just Us Girls Challenge 220.  It's been forever since I've participated in one of their challenge.

For the stamped bird, I first masked off the branches and inked up the bird (Momento Rhubard Stalk) and stamped it.  Cleaned off my stamp, masked the bird this time and inked up the branches with Stampin Up Cube (Chocolate Chip) which I really love. To be honest, I've never done this before.  I've masked images the old fashioned way a bejillion times but never right on the stamp.  I first saw it on the a video by Jennifer McGuire.  I think it turned out lovely.  The sentiment, I double stamped it, giving a shadow effect (which I learned from Jennifer as well).  The lighter brown is Color Box Mudslide.  I'm very happy with the result.  On the inside of the card, I stamped the bird image again in the bottom right hand corner to tie it all in.

Thank you for stopping by!

Traci

A Big Hello!


I have been a busy bee this weekend, making all sorts of cards for some very fun challenges.  And then to ship them off to Operation Write Home.  I have several boxes of cards but I can't send all of them mainly because they are too thick.  And I'm in the mood to make Valentine's Day cards, but the cut off is too soon for me.  So my cards will be more 'love' cards.

Try Stamping on Tuesday 147
If you know me, I love green!  Can never get tired of that color.  It's definitely my "go to" color.  I fell in love with the sketch from Try Stamping on Tuesday 147.  Simple elegance!  The flowers are from Prima that I have layered and attached a brad in the center.  My favorite part of the card is normally the flowers, but I am liking the sentiment.  I tried something new, not sure how it would work, but I stamped the sentiments in the Distressed Ink pad and used clear sticky embossing powder (that's all I have-I have some other colors coming from Simon Says-yea!).  The ink was pretty wet, the embossing powder worked wonderful!  I repeated the embossing powder 3 times.  I wanted to make sure it stood out, and it certainly did.

I wanted the tag to stand out a bit, so I used my mounting tape, which is almost gone and you can see.  I am hoping my photos are looking better.  I got a new phone this week.  Finally gave the iPhone the boot (which was going crazy, doing all kinds of stupid stuff) and switched to the Galaxy s4.  I am still trying to get used to it.  One of the reasons I got it is because of the camera.  I am loving the results.

Thanks for stopping by!       Traci

Dynamic Duo 84 ad FMC 117

This card was a lot of fun to make.  I am finding myself gravitating toward simple, clean lines.  Freshly Made Card Challenge 117 made it so easy.  And what made it even easier was using the Dynamic Duo Color Challenge.  I was able to pull from my stash some texture papers that go well together, cut them different widths and lengths, cut the ends for ribbon tails.  I found it easier to have a scrap piece of CS, 1/2" x 3", apply my tape runner adhesive.


That way I could place and reposition if needed these ribbons.  I trimmed the top to a nice clean line.  The stamp is from Stamps of Life that I had cut apart.  The words were stacked and I wanted them to be side by side.  I had to get my glasses on for this one since it is a pretty small stamp.  I added hand drawn stitching lines on the white CS.  I had to ink the edges of just one of the ribbons so it stands out a bit more.

 And then the fiber.  I am determined in using all those fibers.  I was in several exchanges many years ago (when I was active on Two Peas) and I got so many fibers in different colors and textures.  I just hate to throw them out.  Because of the thickness of the fibers, I put foam tape under the white CS.

I have decorated the inside of every card I've been making lately, but I felt this card needed it.  Thanks for stopping by!   Traci

Sunday, December 15, 2013

Paper Christmas Bow SCIC 73


I purchased a new gizmo this week.  It's the Envelope Punch board by We R Memory Keepers.  I was debating about getting it.  Then, I found the most wonderful thing...You Tube videos on how to make more than just envelopes with this gizmo.  You can make boxes and bows in all shapes and sizes.  I found this one by Knallcrafting, and I was hooked.  And the bonus was it was on sale at Michael's, no need to use my coupon.

First I tried it with mulberry paper.  Don't bother, it's way too fragile.  I just used patterned paper, well, it's just solid color as you can see.  The dimensions I used were:  2 pieces at 1" x 6", 1 piece at 1/4" x 1.25".  The first piece. the halfway mark is 3", so that was my first punch and then did punch on other side at 3".  I did the ends just as the video said and it turned out perfect!  I love it when that happens.  The tail piece were punched at 3" as well but the ends were centered at the punch.  It came out looking sweet!  I only put the center (the smallest piece) around the bow, not the tail.  I glued this all down with photo splits cut in half.

The leaf die is from Sizzix.  I had to go over it with my Big Shot 2-3 times to get it to cut.  I cut out two thinking I might using both on the front, but it was way too busy.  I used the second one for the inside of the card.  I used a glue pen (Martha Stewart) on this. The sentiment is from Stamps of Life.  It was from a bonus set that Stephanie sends out to her club members.  I changed it up a bit.  It was stacked, where the Merry was above Christmas.  I've seen alot of stampers cut their stamps apart so they could place the sentiments where they want it.  I got brave and did it!  It turned out super cute!  I added the free-hand cut heart and added my secret weapon (Glossy Accents) to it for dimension.  The inside was just an echo from the outside.

I was inspired by the gorgeous photo on Stampin' Celebration Inspiration Challenge #73.  It was definitely the chair covers.  I do love simple elegance.

Thanks for stopping by!

Traci


My first entry Operation Write Home 203


This is my first entry with Operation Write Home.  I don't know how I didn't hear about it before.  It's such a perfect fit for me. My daughter's husband is in the Army.  He just got home from his deployment in Africa 2 weeks ago.  (Glad you're home Hai!!)  And I have so many cards!  I am waiting for my stamp to come (to stamp the back of the cards) so I can send my first shipment to them.

First thing this morning, I got this wonderful sketch in my email box.  Such details in the measurements!  I must say I did like having those.  This card has more layers that I am used to.  But I am willing to step out of my comfort zone.  And besides, it's using more of my stash!

203The base of the card is a very dark brown, then I used black (this is the layer I don't normally do, but I like the way it helps the top layers pop).  Then the tan/kraft layer.  The patterned paper I used has that beautiful green on the other side.  I did several things with this card that I normally don't do.  First, is the black layer, that I already mentioned.  Second, I applied all layers up to the three think strips then I inked the edges.  I usually ink one layer at a time, but I forgot to do it before they were all glued down. To be honest, I love the way it turned out. Third, I picked out my embellishment and sentiment after the card was all cut out.  What was I thinking?!  I rummaged through my embellishments hoping and praying that I could find something, anything.  I feel I lucked out by finding this motorcycle (and the Woody car on the inside of card). I inked around the edges with my distressed inks. Fourth, I inked the fiber.  I've NEVER done that before.  I felt it needed to be a bit darker.  I used my distressed ink and applicator.  It turned out very nice.

Because the card base was dark brown, it was necessary to put a lighter CS on the inside.  I was able to use the Woody for the inner embellishment.

Thanks for stopping by!

Traci

White on White Paper Players 176


My!  I love the look of white on white!  It looks very elegant and was so super easy!  No need to worry about matching colors of embellishments with background paper and ink.  It took that worry all away.  Better than a Ativan....that is a nurse joke!

I started with a standard A2 size card (4 1/4 x 5 1/2).  I used the swirl embossing folder from Cuttlebug and ran it through my Big Shot.  I trimmed it down to 3 3/4 x 5.  I used Glossy Accents to adhere it to the card.  The flower dies are the really thick dies from Sizzix.  There are four sizes of flowers on this die.  I use this A LOT!!! because I love it so much.  I cut these out of white chipboard.  I have plain chipboard is black and white.  I purchased these about 2 years ago.  Using my Crop a dile, I attached these star brads into the center.  The leaves were punched out circles of white cardstock.  Then I put those circles in the circle punch again to make them leaf shape.  Using my scoreboard, I scored down the center.  All of these are attached to the embossed background with Glossy Accents.  Because we can use a neutral or metallic accent/sentiment, I pulled out my gold pigment ink pad and used this stamp from Stamps for Life crayons2stamp .  I cut it into the shape of a banner and adhered it with foam tape.  This foam tape was given to me about 6 years ago.  It was huge when I got it.  Very little used.  Now, it's almost gone.  Looks like I will be getting some foam dots really soon.

Thanks to The Paper Players for a wonderful challenge!

Thanks for stopping by!

Traci


Retro Sketches 94 and SSC65


 This card is really showing how old my stash is.  This card is retro in the fact that I am using embellishments that people don't use much any more.  First, the chipboard.  I got this 3-4 years ago.  It was plain.  I covered it with patterned paper and inked the edges.  The eye is a brad, which is second.  I don't see many brads on projects lately.  I have so many!  At least I think I do.

And thirdly, the paper under the bird.  I don't even know what it's called anymore!  It's been at least 10 years since I bought it.  It's like super thin homemade paper (like mulberry paper without the strands).
See how the edges fray?  I got that effect by putting my straight edge on top of the paper and ripping (cutting) the edge to the size I want. In the past,  I've also wet the shape or size of the paper that I wanted the frayed edges.   I'm not sure if I'm explaining it right.  I can make a post just on this paper (and mulberry paper) if anyone is interested.

As you can see, I am changing my photos.  I've learned to add the watermark.  I am still experimenting with lighting.  As of right now, I am using my phone to take photos.

  http://retrosketches.blogspot.com/2013/12/retrosketches-94.html .http://sundaystamps.blogspot.com/2013/12/ssc65-were-feeling-neutral.html

This will be my first time to participate with Sunday Stamps.  The design team did a beautiful job with wonderful examples.  Retro Sketches amazes me with their very creative sketches.

Before I forget, I wanted to say something about the three little embellishments on the bottom right coroner.  I really like the look of gems and I go through them like water.  With my commitment to to buy anymore embellishments, I made my own.  I inked up the saffron color CS and using my Crop a dile, I punched three circles, glued them in place and added Glossy Accents on top.  By adding yellow to this corner, I helped balanced the card.

Thanks for stopping by!

Traci

Thursday, December 12, 2013

Spilling Hearts for CAS(E) this Sketch! #57 & PPA 183


PPA183Oh!! I love pink and green.  Okay, I love any color and green!  Did I mention I love green?  Pals Paper Arts color challenge is Pink, Green and white.  I don't have the exact colors because I am depleting my stash.  In fact, the papers I used on this card (except for the card base) are scraps.  Yippee!  I used a leaves embossing folder by Cuttlebug for the green strip.  The hearts are stamped in white embossing ink and used the clear embossing powder.  I am still using the sticky embossing powder, because that's all I have right now. I think that is why it looks sparkly.  That was just an added bonus.
The Sketch I chose for this card is from CAS(E) this Sketch! #57.  They have beautiful samples from their design team.  I loved two of them and attempted to combine the elements that I loved into my card.  Thanks to their guest designer Cindy Lovell and Donna Mikasa.  I loved Donna's textured strip and the heart theme of Cindy's card.  And I must not forget the inside.
Thanks for stopping by!


Tuesday, December 10, 2013

Banners and Friday Mashup FM138 Do-over

I made a card late last night.  Note to self:  no making cards late in the night and then posting them.  So this is my Do-over.  Don't we wish we were able to do more do-overs in life?

 The Friday Mashup! 138 is the challenge I chose.  I haven't done a window card in many years.  Remember, I've been card making for 20 years.  Back when we only had decorative scissors to play with.  My, things have changed.    I've never been a huge banner fan, but I thought I would give it a go.  I bought this set at Michael's.  It is full of banners and washi tape designs.  I used the red cat's eye stamp set for the banners and hearts. I used foam tape under the banners and curled the edges to give the appearance of them flying in the wind.  The love (word)  stamp is from trees4christmas by Stamps of Life.  She has adorabale stamps with dies to match. The hearts I purchased at Micheal's as well.


Since I took these pics, I have added a white panel next to the hearts.  I think it's easier to read what is written. 

Thanks for stopping by.  I love hearing from you!

Traci

Monday, December 9, 2013

Photo Box, Early Valentines and Mojo Monday 323


Last year, I had a friend make me a photo box so I could take better pics of my cards.  And I haven't been using it, so sorry.  This card was giving me grief while taking pics.  It has everything to do with the sentiment...it's a sticker.  The flash was bouncing off the shiny sticker in the middle of the card.  It was rather frustrating. So, I pulled out the photo box.

I found the directions online on how to make the photo box, also known as a light box.  The directions online use cardboard box and vellum paper.  For those that don't have a clue what I am talking about, look here and here .  But my friend went the extra step.  He used left over wood in his garage, painted them white and the side panels are fluorescent light covers.  I currently use two large flashlights as my light source, but will be purchasing spotlights at Home Depot to help with better source of lights. The flashlights don't give enough light. 

The card sketch comes from Mojo Monday 323.  I absolutely love their sketches. The design team does an outstanding job with their samples.  Way to go!!  And you're thinking...Valentines? Again?  Well, yes.  I would like to give my patients a card for each holiday and I need a collection.  (I am a hospice nurse, where I go into patient's homes for care)  The patterned paper is actually hearts that I stamped in Momento Dew Drops Rose Bud and Cat's Eye Rose Coral.  I added brads for some dimension.  The heard on the outside of the circle is stamped is embossed in white.  There is foam tape under the patterned paper (because of the light pink fiber-remember those?), under the circle and the cut out heart.  I really like the way it turned out.

Last but not least, the inside.  This is super simple, almost too plain.  If I know me, I will add something later to spice it up and get rid of  more of my stash.


Thanks for stopping by.  I would love to hear from you.

Traci